欢迎,来自IP地址为:216.73.217.179 的朋友
![]()
NextCloud 是一套优秀的云管理网站程序,由 PHP 开发,免费使用,可以方便的搭建安全的私有云。本教将详细讲解如何在 CentOS 7 系统搭建 NextCloud 私有云。
1、系统说明
- 操作系统:CentOS 7.7
- 主机名:nextcloud
- IP 地址:192.168.1.30
- PHP 版本:7.3.14
- Web 服务器:Nginx
- 数据库服务器:MariaDB
2、LEMP 系统的搭建
a. Nginx Web 服务器的安装
Nginx 服务器使用稳定版,当然也可以使用主线版本。采用官方软件库安装预编译版本。
首先添加一个软件库文件”/etc/yum.repos.d/nginx.repo”,内容如下:
[nginx-stable]
name=nginx stable repo
baseurl=http://nginx.org/packages/centos/$releasever/$basearch/
gpgcheck=1
enabled=1
gpgkey=https://nginx.org/keys/nginx_signing.key
module_hotfixes=true

[nginx-mainline]
name=nginx mainline repo
baseurl=http://nginx.org/packages/mainline/centos/$releasever/$basearch/
gpgcheck=1
enabled=0
gpgkey=https://nginx.org/keys/nginx_signing.key
module_hotfixes=true
之后使用如下命令安装 Nginx 软件:
# yum install yum-utils
# yum install nginx                                //For stable
OR
# yum-config-manager --enable nginx-mainline       //For mainline
# yum install nginx
安装成功后,启动 Nginx 服务并设置为开机启动:
# systemctl start nginx
# systemctl enable nginx
b. MariaDB 数据库安装及 nextcloud 数据库配置
我们安装软件库默认的 MariaDB 数据库,并创建 nextcloud 需要使用的数据库及用户。
安装及配置数据库基本安全性规则,命令如下:
# yum install mariadb mariadb-server
# systemctl enable mariadb
# systemctl start mariadb
# mysql_secure_installation
设置完成后,以 root 用户登录数据库,创建 nextcloud 需要使用的数据库及用户:
# mysql -u root -p
MariaDB [(none)]> CREATE USER 'cloud'@'127.0.0.1' IDENTIFIED BY 'cloud';
MariaDB [(none)]> CREATE DATABASE IF NOT EXISTS nextcloud CHARACTER SET utf8mb4 COLLATE utf8mb4_general_ci;
MariaDB [(none)]> GRANT ALL PRIVILEGES on nextcloud.* to 'cloud'@'127.0.0.1';
MariaDB [(none)]> FLUSH privileges;
MariaDB [(none)]> EXIT;
c. 安装 PHP 7.3.14
首先下载 PHP 7.3.14 的源文件包压缩包,进入源文件目录,使用如下命令进行编译安装:
# wget https://www.php.net/distributions/php-7.3.14.tar.gz
# tar -zxvf php-7.3.14.tar.gz
# cd php-7.3.14/
# ./configure --enable-fpm --with-zlib --with-pdo-mysql --with-mysql-sock=/var/mysql/mysql.sock
# make && make install
安装完成后,使用如下命令创建 PHP 和 php-fpm 的配置文件,并将 php-fpm 工具移动到默认可以执行目录:
# cp php.ini-development /usr/local/lib/php.ini
# cp /usr/local/etc/php-fpm.conf.default /usr/local/etc/php-fpm.conf
# cp /usr/local/etc/php-fpm.d/www.conf.default /usr/local/etc/php-fpm.d/www.conf
# cp sapi/fpm/php-fpm /usr/local/bin
修改”/usr/local/lib/php.ini”,将”cgi.fix_pathinfo=1″取消注释,并修改为”cgi.fix_pathinfo=0″;
修改”/usr/local/etc/php-fpm.conf”,将”include=NONE/etc/php-fpm.d/*.conf”修改为”include=/usr/local/etc/php-fpm.d/*.conf”;
修改”/usr/local/etc/php-fpm.d/www.conf”,将”user=nobody”修改为”user=nginx”,将”group=nobody”修改为”group=nginx”;
修改”/etc/nginx/conf.d/default.conf”,将 CGI 部分内容修改如下:
location ~ \.php$ {
    root           /usr/share/nginx/html;
    fastcgi_pass   127.0.0.1:9000;
    fastcgi_index  index.php;
    fastcgi_param  SCRIPT_FILENAME  /usr/share/nginx/html$fastcgi_script_name;
    include        fastcgi_params;
}
最后,创建一个 php 文件 php.php,用于验证 nginx 和 PHP 工具是否正常:
# echo "<?php phpinfo(); ?>" >> /usr/share/nginx/html/php.php
执行如下命令,启动 php-fpm 和 nginx:
# php-fpm
# systemctl restart nginx
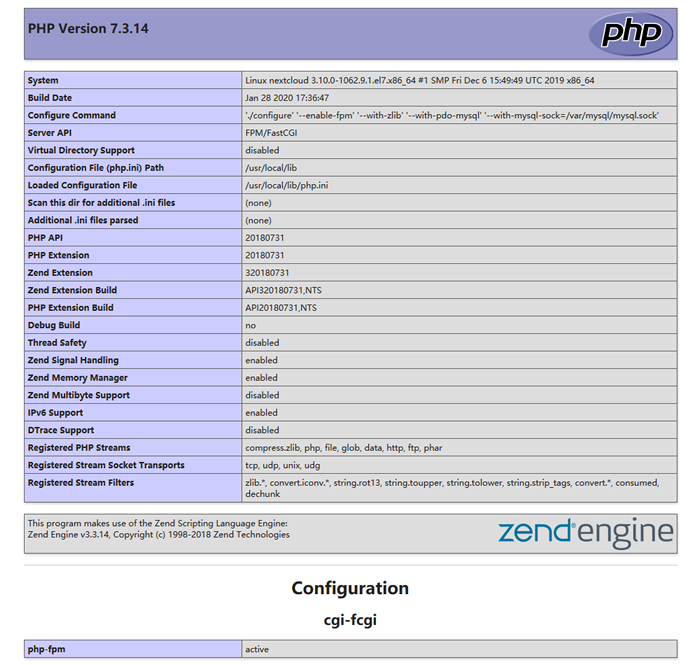
使用浏览器访问”http://192.168.1.30/php.php”,如果见到 PHP 的信息页面,则表示 nginx 和 PHP 全部安装配置成功。信息页面如下所示:
由于编译安装 PHP 时没有安装过多扩展,则 nextcloud 需要使用的一些扩展需要手动安装。
这些扩展包括:
- PHP module curl
- PHP module GD
- PHP module mbstring
- PHP module openssl
- PHP module zip
安装的方法也比较容易,就是在 PHP 的源代码目录中有一个”ext”目录,该目录中保存了几部的扩展源文件,进入对应的目录,使用如下命令进行安装:
# phpize
# ./configure
# make && make install
全部扩展安装完成后,在 PHP 的配置文件”/usr/local/lib/php.ini”中加入如下内容,重新启动 php-fpm 以及 nginx,则扩展即成功启用:
extension = curl
extension = gd
extension = mbstring
extension = openssl
extension = zip
d. 源代码安装故障处理
源代码安装 PHP 及扩展,难免会遇到报错,多半是由于依赖文件未安装引起的,根据系统给出的提示就可以解决。常见的报错信息及解决办法如下:
* configure: error: no acceptable C compiler found in $PATH
# install gcc

* Cannot find autoconf. Please check your autoconf installation and the $PHP_AUTOCONF environment variable. Then, rerun this script.
# yum install autoconf

* configure: cURL version 7.15.5 or later is required to compile php with cURL support
# yum install curl curl-devel

* 由于 GD 扩展默认不支持  jpeg 格式,则通过如下方法编译 GD库
# wget http://ijg.org/files/jpegsrc.v9d.tar.gz
# tar -zxvf jpegsrc.v9d.tar.gz
# cd jpeg-9d/
# ./configure --prefix=/usr/local/jpeg --enable-shared --enable-static
# make && make install
# cd php-7.3.14/ext/gd/
# phpize
# ./configure --with-php-config=/usr/local/bin/php-config --with-jpeg-dir=/usr/local/jpeg
# make && make install

* configure: error: png.h not found.
# yum install libpng-devel

* Cannot find config.m4
# mv config0.m4 config.m4

* configure: error: Cannot find OpenSSL's <evp.h>
# yum install openssl-devel

* configure: error: Please reinstall the libzip distribution
* checking for libzip... configure: error: system libzip must be upgraded to version >= 0.11
# yum remove libzip
# wget https://nih.at/libzip/libzip-1.2.0.tar.gz
# tar -zxvf libzip-1.2.0.tar.gz
# cd libzip-1.2.0
# ./configure
# make && make install

* /usr/local/include/zip.h:59:21: fatal error: zipconf.h: No such file or directory
# cp /usr/local/lib/libzip/include/zipconf.h /usr/local/include/zipconf.h
3、安装 NextCloud
之前已经说过,NextCloud 是一个 PHP 网站,使用的话,只需要将网站程序下载后放置于网站目录即可完成安装,启用网站的话,则需要添加 Nginx 配置。
首先下载 NextCloud 程序并将其放置于网站目录:
# wget https://download.nextcloud.com/server/releases/nextcloud-18.0.0.zip
# unzip nextcloud-18.0.0.zip -d /usr/share/nginx/
# chown -R nginx:nginx /usr/share/nginx
然后添加一个配置文件”/etc/nginx/conf.d/nextcloud.conf”,文件内容如下:
upstream php-handler {
    server 127.0.0.1:9000;
    #server unix:/var/run/php/php7.2-fpm.sock;
}
#server {
    # listen 80;
    # listen [::]:80;
    # server_name 192.168.1.30;
    # return 301 https://$server_name:443$request_uri;
#}
server {
    listen 80;
    # listen 443 ssl http2;
    # listen [::]:443 ssl http2;
    server_name 192.168.1.30;
    # ssl_certificate /etc/letsencrypt/live/yun.daehub.com/fullchain.pem;
    # ssl_certificate_key /etc/letsencrypt/live/yun.daehub.com/privkey.pem;

    add_header Referrer-Policy "no-referrer" always;
    add_header X-Content-Type-Options "nosniff" always;
    add_header X-Download-Options "noopen" always;
    add_header X-Frame-Options "SAMEORIGIN" always;
    add_header X-Permitted-Cross-Domain-Policies "none" always;
    add_header X-Robots-Tag "none" always;
    add_header X-XSS-Protection "1; mode=block" always;

    # Remove X-Powered-By, which is an information leak
    fastcgi_hide_header X-Powered-By;

    # Path to the root of your installation
    root /usr/share/nginx/nextcloud;

    location = /robots.txt {
    allow all;
    log_not_found off;
    access_log off;
    }
    location = /.well-known/carddav {
    return 301 $scheme://$host:$server_port/remote.php/dav;
    }
    location = /.well-known/caldav {
    return 301 $scheme://$host:$server_port/remote.php/dav;
    }

    # set max upload size
    client_max_body_size 512M;
    fastcgi_buffers 64 4K;

    # Enable gzip but do not remove ETag headers
    gzip on;
    gzip_vary on;
    gzip_comp_level 4;
    gzip_min_length 256;
    gzip_proxied expired no-cache no-store private no_last_modified no_etag auth;
    gzip_types application/atom+xml application/javascript application/json application/ld+json application/manifest+json application/rss+xml application/vnd.geo+json application/vnd.ms-fontobject application/x-font-ttf application/x-web-app-manifest+json application/xhtml+xml application/xml font/opentype image/bmp image/svg+xml image/x-icon text/cache-manifest text/css text/plain text/vcard text/vnd.rim.location.xloc text/vtt text/x-component text/x-cross-domain-policy;

    location / {
    rewrite ^ /index.php;
    }

    location ~ ^\/(?:build|tests|config|lib|3rdparty|templates|data)\/ {
    deny all;
    }
    location ~ ^\/(?:\.|autotest|occ|issue|indie|db_|console) {
    deny all;
    }

    location ~ ^\/(?:index|remote|public|cron|core\/ajax\/update|status|ocs\/v[12]|updater\/.+|oc[ms]-provider\/.+)\.php(?:$|\/) {
    fastcgi_split_path_info ^(.+?\.php)(\/.*|)$;
    set $path_info $fastcgi_path_info;
    try_files $fastcgi_script_name =404;
    include fastcgi_params;
    fastcgi_param SCRIPT_FILENAME $document_root$fastcgi_script_name;
    fastcgi_param PATH_INFO $path_info;
    # fastcgi_param HTTPS on;
    # Avoid sending the security headers twice
    fastcgi_param modHeadersAvailable true;
    # Enable pretty urls
    fastcgi_param front_controller_active true;
    fastcgi_pass php-handler;
    fastcgi_intercept_errors on;
    fastcgi_request_buffering off;
    }

    location ~ ^\/(?:updater|oc[ms]-provider)(?:$|\/) {
    try_files $uri/ =404;
    index index.php;
    }

    # Adding the cache control header for js, css and map files
    # Make sure it is BELOW the PHP block
    location ~ \.(?:css|js|woff2?|svg|gif|map)$ {
    try_files $uri /index.php$request_uri;
    add_header Cache-Control "public, max-age=15778463";
    add_header Referrer-Policy "no-referrer" always;
    add_header X-Content-Type-Options "nosniff" always;
    add_header X-Download-Options "noopen" always;
    add_header X-Frame-Options "SAMEORIGIN" always;
    add_header X-Permitted-Cross-Domain-Policies "none" always;
    add_header X-Robots-Tag "none" always;
    add_header X-XSS-Protection "1; mode=block" always;
    # Optional: Don't log access to assets
    access_log off;
    }

    location ~ \.(?:png|html|ttf|ico|jpg|jpeg|bcmap)$ {
    try_files $uri /index.php$request_uri;
    # Optional: Don't log access to other assets
    access_log off;
    }
}
配置文件是官方的标准内容,使用了 SSL 证书开启 HTTPS 服务,演示起见,没有使用域名证书,则对配置文件进行了一些修改。如果在正式环境下使用了域名证书,则将标红内容取消注释,删除第二个 server 配置块中的”listen 80;”即可。
现在,通过浏览器访问”http://192.168.1.30″,就会见到如下页面:
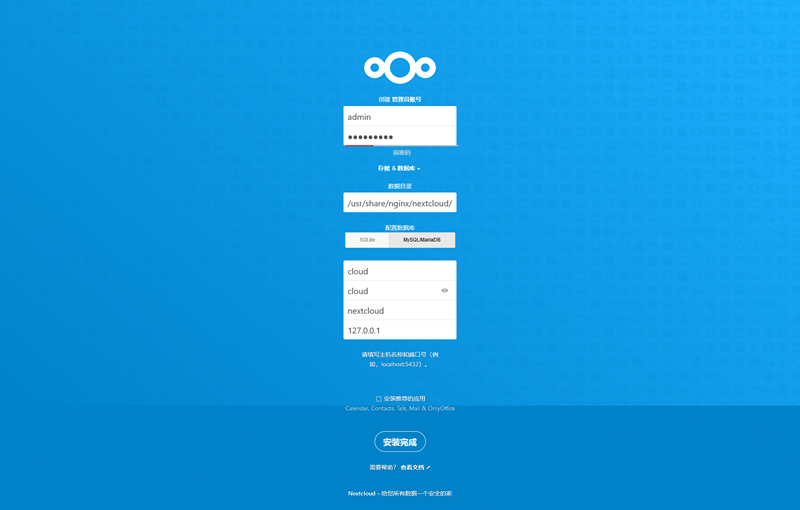
如图所示,输入管理员帐号用户名、密码;数据目录保持默认;配置数据库选择”MySQL/MariaDB”,并输入之前创建的数据库及用户信息,点击”安装完成”继续。
安装完成后,使用设置的管理员帐号登录到系统,就会见到如下页面:
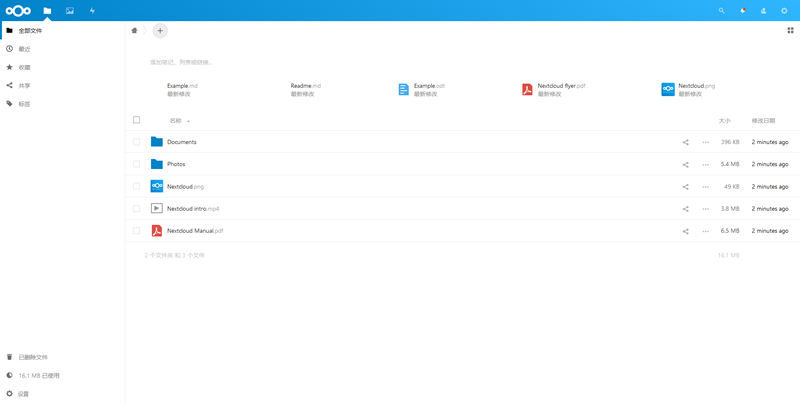
至此,NextCloud 私有云就全部搭建完成,享受 NextCloud 带来的便利吧。
